UPDATE – October 25, 2024:
We just released an update with a new feature: timeshift !
Some people needed the EPG to show data in another timezone …
Just replace the epg.py with this one, and on line 7 of this file, you can set the EPGOffSet for timeshift.
(3 is 3 hours forward in this example)
Also, furthermore, we fixed the layout view for extreme small show intervals etc … making the general appearance looks “nicer” …
UPDATE – September 5, 2024:
An anonymous person, naming himself X (probably from Slovakia, looking at the IP-address), pointed me out that in the EPG_timer.py on line 39,
you also need to check/correct, the IP/URL of your HA instance !!!
UPDATE – August 6, 2024: There was a bug in epg.py, causing the layout to shift.
This is fixed in this file.
UPDATE – July 30, 2024: I had 2 remaining issues left:
1. when starting the search-function for the first time of the day, we got a “file not found”, this is solved.
2. when using the functionality to add an item to the the calendar, you now also get a notification (small “snack-bar” on the top of the epg-screen.
So, to have this fix installed, start with downloading this zip-file, and to the following with the files:
– overwrite epg.py and search.py in the EPG folder
– put epg_search_empty.py in your /config/pyscript folder
– open EPG-daily-load automation.txt in a text-editor, copy the complete content,
and overwrite all data in the YAML of the EPG-daily-load automation.
UPDATE – July 29, 2024: I fixed the issue with putting an item in my agenda ! No download popups or empty screens on iPad 🙂
All you need to do is create a long-lived token in HA (see “Long lived access token” on this page: https://developers.home-assistant.io/docs/auth_api/
and download this zip-file, and unzip in into your EPG folder, overwriting the epg.py and search.py files.
You need to replace line 212 in search.py and line 330 in epg.py (replace the text generate_a_long_lived_token_in_HA_and_put_it_here by the token, leave the rest of the line as it is …)
I fixed this issue by replacing the link (to the webhook), to a javascript with a “fetch” (POST-method),
that “emulates” a CURL command, so I could also use a Bearer token for authentication …
UPDATE – July 26, 2024: Download this zip-file and extract it in your EPG-folder (overwrite search.py), this adds calendar functionality in the Search function.
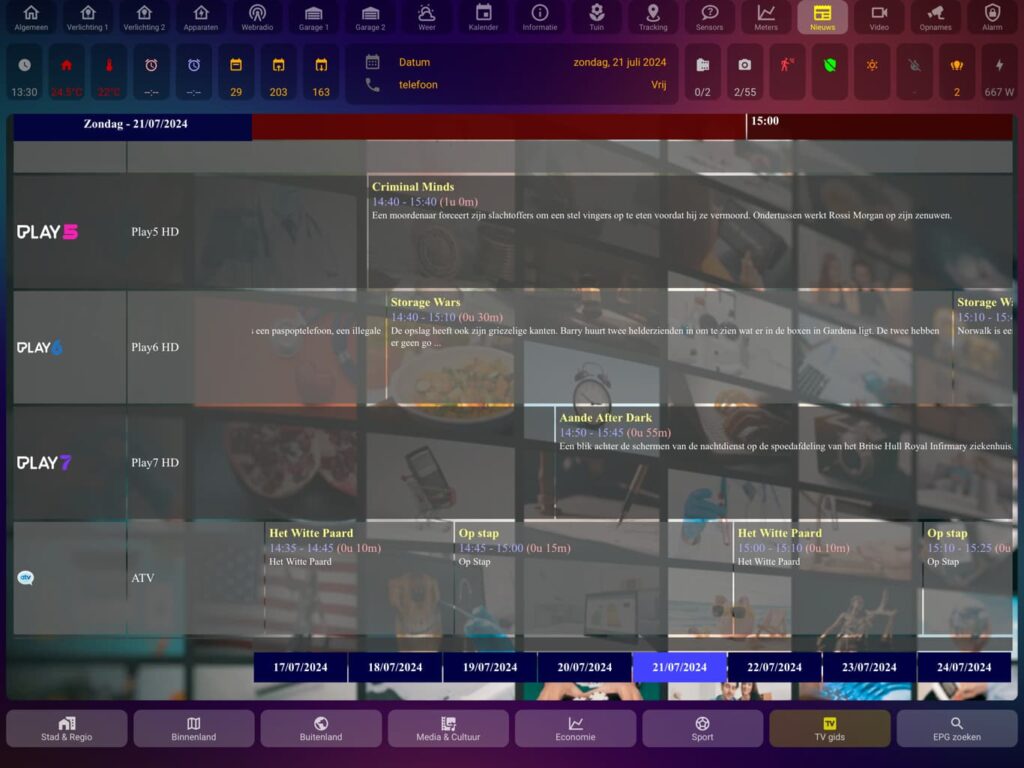
Because we don’t have a TV-guide that contains all channels we can watch, we decided to integrate an EPG within Home Assistant.
After trying several projects from github, we always stumbled upon at least one issue.
(Mostly due to the high number of channels we wanted to show)
So, I came up with my own EPG 🙂
A. Pre-requisites:
1. A place to download EPG data in XML format
2. A folder where all EPG functionality is stored within HA
3. Channel logos
4. Pyscript Python scripting
5. Config-template-card
B. Nightly workflow:
1. Daily download the latest XML, with all our chosen/needed channels.
2. Delete all HTML files from within the EPG folder and clear data from your sqlite3 DB.
3. Read this complete XML file into an sqlite3 DB.
4. Convert all data from within this sqlite3 DB, into separate HTML files, per day.
C. Usage workflow:
1. When looking at the EPGuide, “slide” the data to the right/left automatically, so the current time is in the “middle” of the screen.
D. Search workflow:
1. When typing some search-criteria and clicking the “search” button, a custom HTML is generated on the fly, containing all relevant data.
E. Adjustments:
To make the EPG more customized to your needs, their are a few adjustments that can be done:
1. Channel list and sorting order
2. customize the layout to your needs
F. Calendar automation:
1. What does it do ?
2. Some extra automations needed
A.Pre-requisites
1. You need a location to download EPG XML data.
We use Crazy EPG Web from https://www.bevy.be , they have a giant collection of EPG data, from channels/countries from over the whole world.
Their service is free, but if you like them, donate some (monthly) fee, even a Euro per month is OK 🙂
Create a free account, login to Crazy EPG Web, and select the countries and channels you want to include in your daily XML file.
The EPG links can be downloaded without the need to logon, we are going to use this in a nightly automation. (We use the XML link, not the XML.GZ)
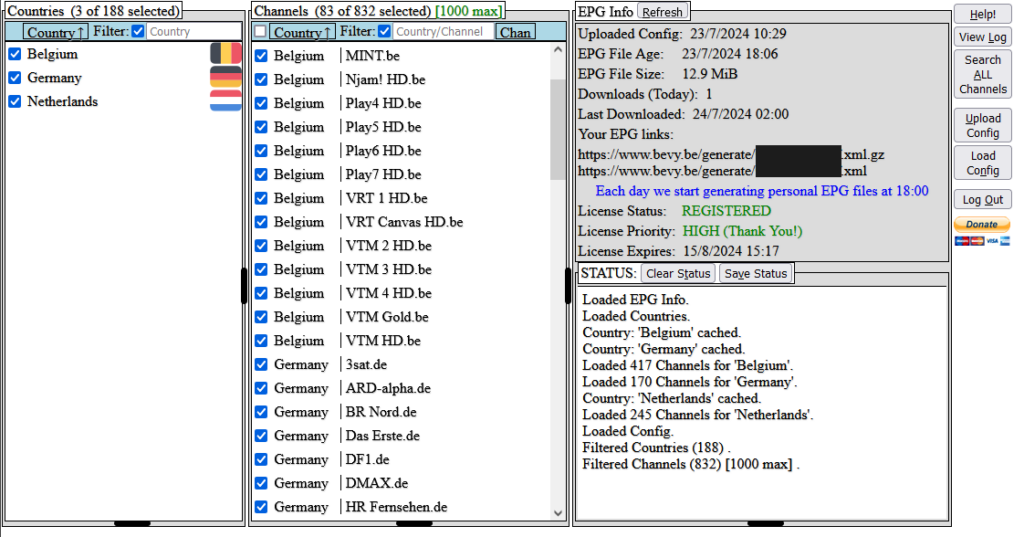
2. We also need a folder within Home Assistant to store our EPG-related data.
Inside the www-folder, we create a folder ‘epg’, so our epg-location is /config/www/epg/
This folder needs to be within the www-folder, because it needs to be reachable from within the HA web URL.
/config/www/epg/ results in https://192.168.123.88:8123/local/epg/ (where the IP is your HA-ip of course)
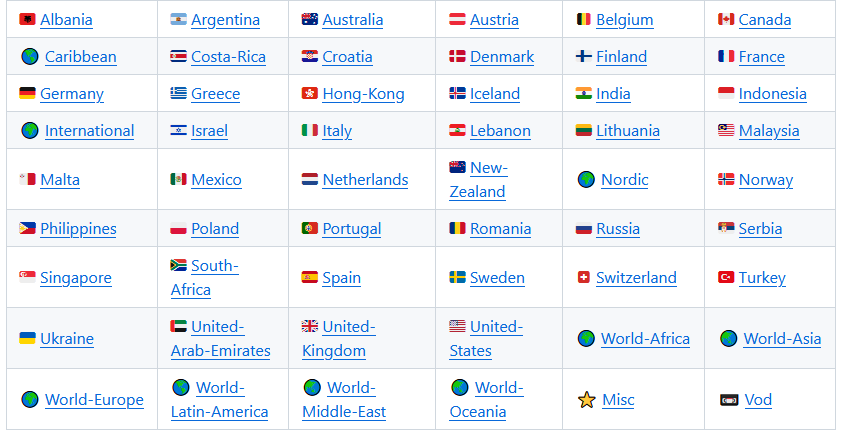
3. Channel logos can be retrieved from here: https://github.com/tv-logo/tv-logos
They offer logos for 52 countries (about 9586 channels) in background-transparent PNG format.
You can download them for free. (Click on the green “<> Code” button on github, and next click “Download ZIP”)
4. Install the following integration: “Pyscript Python scripting”.
Download the following zip-file, and extract it in /config/pyscript/
These are 4 files:
– epg_calendar.py to put a clicked channel/transmission timeslot into your agenda.
– epg_search_start.py is trigger by the search functionality, to put the search parameters into the sqlite3 db.
– epg_search_stop.py is triggered after the python search.py, to get the search URL back into HA.
– epg_timer.py to reflect the current date/time-slot into the iframe that is showing the current HTML.
5. Install the config template card from here: https://github.com/iantrich/config-template-card
And finally, after all these prerequisites, download this zip-file and extract it into /config/www/epg/ on your HA to get started 🙂
This ZIP-file includes my XML file, HTML files for July, 22-30 – 2024, a filled epg_data.db,
logos for Belgium, The Netherlands and Germany.
However, you need to change 192.168.123.88:8123 in epg.py, search.py to you own HA IP:port (or HA name:port)
B.Nightly workflow
1. First of all, we need a few shell_commands, to make those all 3 at once, at the following into your configuration.yaml , and restart home assistant.
– epg_download is used to download your bevy xml file to your HA epg-folder.
– epg_to_sqlite put the XML data into the sqlite DB and creates HTML files for every date in the XML file.
shell_command:
  #---------------------------------------------------------------------
  #--- Replace XXXXX.xml with your bevy XML filename                 ---
  #---------------------------------------------------------------------
  epg_download: curl -L "https://www.bevy.be/generate/GDFMxxPZaf.xml" -o /config/www/epg/epg.xml
  epg_to_sqlite: python /config/www/epg/epg.py
  epg_search: python /config/www/epg/search.py
For downloading this new XML file every night, we have an automation, called EPG-daily-download, which is triggered every night at 2 AM.
Create a new automation, edit it in YAML mode, and copy/paste the next code in it, and save it.
This automation triggers 2 services at 2 AM:
– download the XML file to your epg folder
– 30 seconds later, the XML data is put into the sqlite3 database and generate HTML file for every date in the database.
(Note that previous data and previous HTML files are also deleted at this step !)
alias: EPG-daily-load
description: ""
trigger:
  - platform: time
    at: "02:00:00"
condition: []
action:
  - service: shell_command.epg_download
    data: {}
  - delay:
      hours: 0
      minutes: 0
      seconds: 30
      milliseconds: 0
  - service: shell_command.epg_to_sqlite
    data: {}
mode: single
You will have an HTML file per date in the DB, and find them into your EPG-folder.
For example, bevy puts data for (mostly) 8 days in their XML: yesterday, the day before, today, and 5 days in the future. So if it is today July 24, 2024,
you will have 8 files: 20240722.html – 20240723.html – 20240724.html – 20240725.html – … 20240729.html
To make everything work, we need several helpers. They are all of type “input_text”, 0 minimum length, 255 maximum length.
So please create the following list of helpers first:
| Name | Description |
|---|---|
| epg_url | URL used to move EPG to correct date and timeslot (updated every half hour) |
| epg_title | Used to search for titles |
| epg_time | Current “time(slot)”, in 30 minutes slot |
| epg_search_url | URL to show search-results |
| epg_recid | ID of clicked program-slot for a certain channel. (used to put program-slot into Calendar) |
| epg_description | Used to search for descriptions |
| epg_date | Current date in html-file format (yyyyMMdd) |
| epg_channel | Used to search for given channel |
| epg_calendar_summary | Title of program-slot for calendar |
| epg_calendar_start_date_time | Start date/time of program-slot for calendar |
| epg_calendar_location | Channel to be used as location for calendar |
| epg_calendar_entity_id | Calendar sensor name for adding TV events |
| epg_calendar_end_date_time | Stop date/time of program-slot for calendar |
| epg_calendar_description | Description for program slot to put into calendar |
C. Usage workflow
Create the following automation:
alias: epg-update date & time entity every minute
description: ""
trigger:
  - platform: time_pattern
    minutes: /1
condition: []
action:
  - service: pyscript.epg_timer
    data: {}
mode: single
The above automation takes care of the fact that the pyscript epg_timer is run every minute.
This takes care of the “scrolling” of the EPG to the correct timeslot.
Also, putting an HTML, containing the EPGuide, doesn’t simply need an iFrame, this iFrame needs to be put into a config-template-card (try putting a full URL with an epg html into the input_text.epg_url , to get the correct HTML displayed)
type: custom:config-template-card
variables:
  - states['input_text.epg_date'].state
  - states['input_text.epg_time'].state
  - states['input_text.epg_url'].state
entities:
  - input_text.epg_date
  - input_text.epg_time
  - input_text.epg_url
card:
  type: iframe
  url: ${ states['input_text.epg_url'].state }
  aspect_ratio: 58%
  styles: null
  card:
    - border-radius: 10px
D. Search workflow
For the search functionality to work, we still need to do a few things …
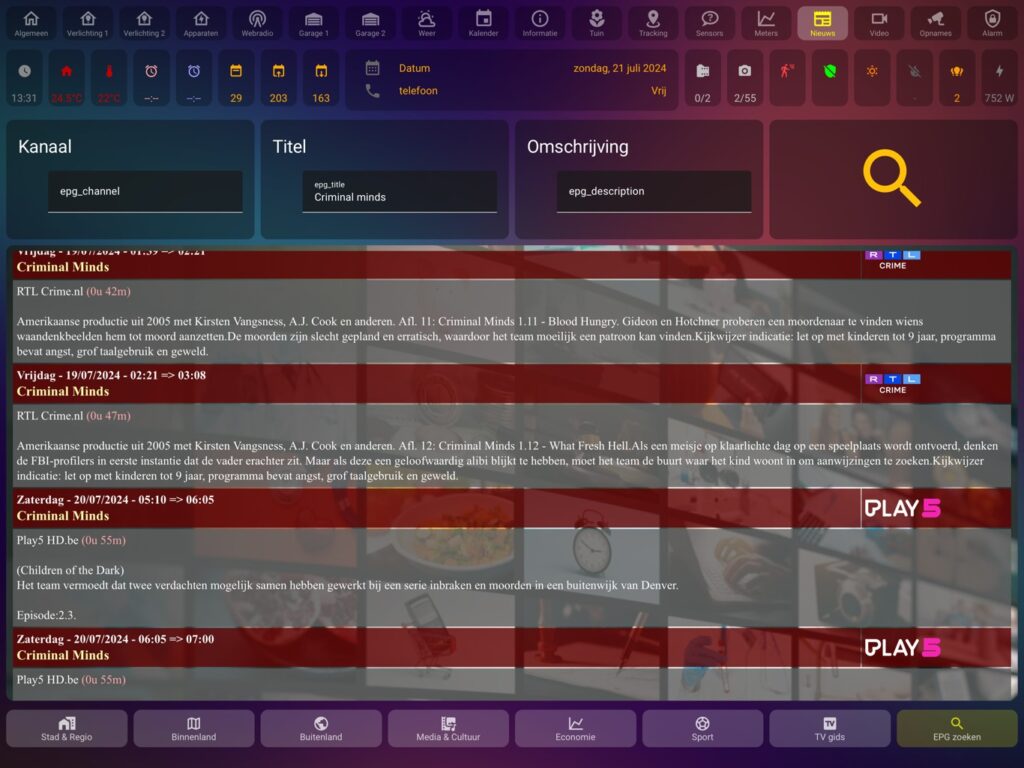
You need to put input_text.epg_channel , input_text.epg_title and input_text.epg_description onto a dashboard, and a button,
that triggers epg_search automation.
          tap_action:
            action: call-service
            service: automation.trigger
            service_data:
              entity_id: automation.epg_search
Of course, this automation first needs to be build:
alias: epg_search
description: ""
trigger: []
condition: []
action:
  - service: pyscript.epg_search_start
    data: {}
  - service: shell_command.epg_search
    metadata: {}
    data: {}
  - service: pyscript.epg_search_stop
    metadata: {}
    data: {}
mode: single
-When you push this search button, the values of the 3 input_text fields get stored into the sqlite3 db via the pyscript epg_search_data. (otherwise we will not be able to get these values easily available within python itself.
– Next, the search.py python gets triggered via the shell_command. This reads out the 3 values of the input_text fields from the sqlite3 DB, queries the epg_data from that same database, and returns an HTML page with the results. Because cashing would cause the results being showed, always be the same, this HTML file does always have a different name. in input_text.epg_search_url, you will always find the latest full URL/link to the latest search results.(this is done in the 3rd step of the automation) Putting this value as the URL for an iframe, will always shows you the latest results.
This is where the config-template-card comes in:
type: custom:config-template-card
variables:
  - states['input_text.epg_search_url'].state
entities:
  - input_text.epg_search_url
card:
  type: iframe
  url: ${ states['input_text.epg_search_url'].state }
  aspect_ratio: 45%
  styles: null
  card:
    - border-radius: 10px
Every time the input_text.epg_search_url changes, this new file/url gets read into the iframe, showing the latest search results …
E. Adjustments
Because not everybody needs the same channels, or the same channel-order, some manual intervention is needed.
Those changes need to be made in the epg_data.db , the sqlite3 database.
There are several ways to do this:
– CommandLine: goto /config/www/epg/ from within a terminal, and type: sqlite3 epg_data.db
From here on, you can perform db manipulation from the command-prompt.
More info can be found here: Command Line Shell For SQLite
– I prefer a GUI, to make life easier 🙂
Check out the free tool SQLite Browser: DB Browser for SQLite (sqlitebrowser.org)
Or check out another free tool, called DBeaver: DBeaver Community | Free Universal Database Tool
Both are highly capable of doing what needs to be done.
Download epg_data.db to your local PC (not needed for the commandLine tool), open it with your favorite sqlite GUI tool, make & save your modifications,
close the tool, and re-upload (overwrite) this file within HA, and your are good to go 🙂
1. The channels are listed and arranged in the epg_channel.
First, you need to open the downloaded XML file with a text-editor (nano, notepad(++) or something similar, even the HA file editor will do)
and start with an empty epg_channel table in the epg_data.db
When you look at the XML file, you may forget the first 2 lines.

The channels start with <channel and ends where the lines start with <programme
Som for every channel that you want to show in the EPG, you need to copy the channel id into the epg_channel table, into the channelname.
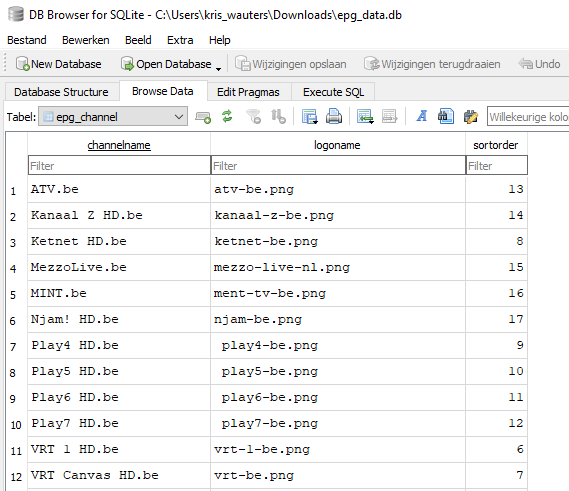
The logoname needs to be filled in, with a filename from the logos folder.
If you don’t have a logo-name, you should create a square empty png, completely background transparent, and put it inside the logos folder.
Use that filename to make sure the channel will “work” 🙂
The last column is “sortorder”, put in a numeric value, the lowest value will be shown first, the highest number will be shown last.
You may leave “gaps” in the numbering, no issue, it follows simply the order from lowest to highest.
2. For customizing the layout, you need to edit 2 files:
– epg.py
– search.py
Both are python files, and can simply be edited with a text editor.
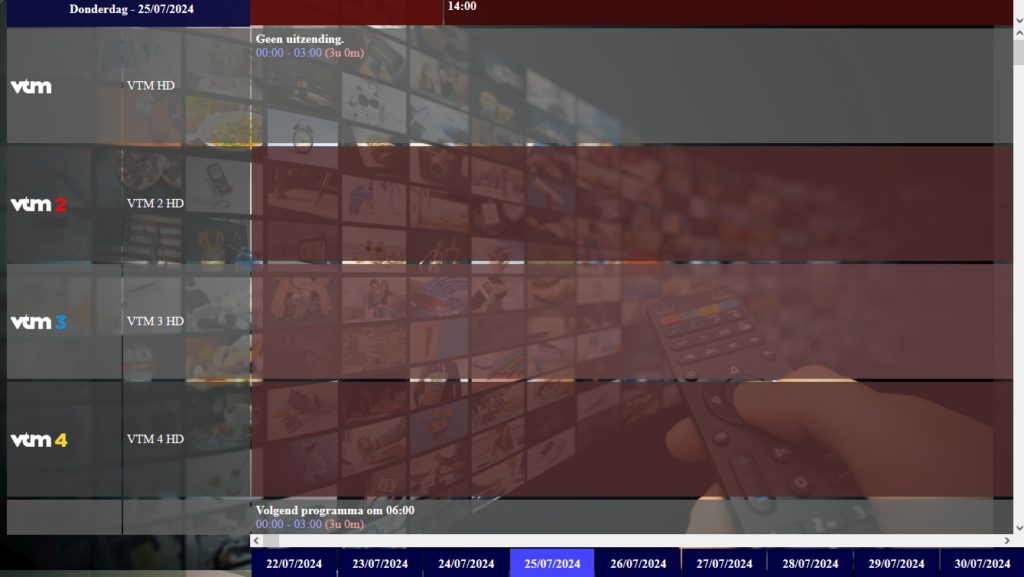
epg.py is responsible for the EPG timelines itself.
From line 79 on, the HTML file is written, until line 189 most of the layout is defined.
– iptv.jpg in the #body style, is the background image behind the epg timeline grid.
– #toptopxxx style is for the top line that contains 2 divs for date/time (left) and the time slider (right)
width defines the width in pixels of the complete wide of the iframe
#lefttopx = the div for the date (left-top, blue in the screenshot)
#righttop = red right topbar with the actual timeslider
#topxx = is the bottom part of the grid, containing the channels on the left, and timelines on the right
#leftx = contains the channels and their icon
#right = contains the actual timelines
make sure that:
– width for toptopx and topxx is the same (this defines the total width of the iframe)
– height for toptopx, lefttopx and righttop is the same (so that the date and timeline scroller is the samen height)
– width for lefttopx and righttop is exactly 100% is you count them together (this is also for leftx and right)
– width for lefttopx and leftx is the same
– height for topxx and right is the same
– height for leftx is 16px lower than topxx
table = border-spacing: 2px; rows/cells don’t touch each-other, leave 2 pixels spacing in between
th / td= padding: 5px; text and logos don’t touch te borders of the cells
tr = uneven rows, background_color is 20% transparent, and does have another color than the even rows.
height = 150 pixels, so there is some room for multiple lines, and also enough height to show the logos.
color = width: general textcolor (is overwritten for some values, further within logic
#even = same logic as tr, but for even lines
#footer = height for the 9 buttons at the complete bottom(right), to go back/forward to another date.
a: link = color/style for a non-visited link (used for title clicking, to put into calendar via a link)
a: visited = color/style for a yet visited link (used for title clicking, to put into calendar via a link)
a: hover = color/style for a link , when you hover over it.
a: link = color/style for an active link, not used in EPG.
Lines in epg.py:
– 7…11: Configuration of filenames and locations.
– 54: Reads all dates from the database, values gotten from XML import.
by changing this query, you can limit the number of files that are build.
-72…76: Change this values to put the names of days in another language. 1=Monday…6=Saturday (0 = Sunday)
– 77: Compose the date-value to show in the upper-left corner.
203…204: Shows hour:minute in the topbar, and puts “anchors” on it, for autoscrolling. (at 00 minutes and 30 minutes)
If you want smaller resolution, you need to change line 200 … 204 and also change epg_timer.py in /config/pyscript/.
-224…226: This construction show the logo and channelname. (line 223 makes difference between even and uneven lines)
-250…253: Construction to make difference between even and uneven rows.
-283: first (red) box of day, if no program starts directly at midnight. (here you can change the color of these cells)
-295…297: Hide description, if cell is to narrow.
-298…301: Shows title, description (or a part of, depending on the length of the description), start/stop-time and “link” to put data in calendar (via webhook), toggling colors/fontsize – depending on data-type.
-310…319; Actual build of right-bottom, with buttons for other dates. Use same query as line 54 !
Lines in search.py:
13…16: Configuration of filenames and locations.
22…27: Create unique filename for every search.
32: Put unique filename in DB (for later retrieval via pyscript, to put into input_text.epg_search_url within HA.
37…41: Get channel,title,description from DB (put there, via pyscript, in HA) to search for.
45…119: Styling of html.
123: Query for getting resulting rows, based on search parameters.
127…180: preparing data to write in HTML resulting row.
165…178: same as 72…76 in epg.py
186…196: create a block of data, with time/date – channel / logo / title / description
F. Calendar automation
1. Sometimes, you want to set a reminder in your agenda, so you don’t forget to watch a specific tranmission on television. For this, I came up with an “automation”.
Every timeslot gets a record ID when imported from XML to the DB. Next, on every timeslot, ther is a link behind the title of a time-slot.
(epg.py is responsible for creating these links.
For me, they look like this: https://192.168.123.88:8123/api/webhook/epgcalendarqOOYo8Ifn57Tjvh1KMiy6Is?message=3073 )
Of course, this depends on your configuration variables, at the top-part of epg.py, and can be adjusted to your likings.
Furtermore, we have a webhook picking up this clicking on titles, and this searches for the title, description, channel, start/stop-time,
and puts this into your linked (google)calendar, informing you when the time is come to watch this transmission on your TV.
Warning ! This functionality only works with the regular EPG, not yet with the search functionality.
(This feature is foreseen for the next update) *UPDATED on July, 26 – 2024, see top of this tutorial*
2. To make this work, you need to add 2 automations (and configure the one that puts items into your calendar)
alias: webhook - epgcalendar
description: ""
trigger:
  - platform: webhook
    allowed_methods:
      - GET
    local_only: true
    webhook_id: epgcalendarqOOYo8Ifn57Tjvh1KMiy6Is
condition: []
action:
  - service: input_text.set_value
    metadata: {}
    data:
      value: "{{ trigger.query.message }}"
    target:
      entity_id: input_text.epg_recid
mode: single
alias: epg calendar - add event
description: ""
trigger:
- platform: state
entity_id:
- input_text.epg_recid
condition: []
action:
- service: pyscript.epg_calendar
data: {}
- service: calendar.create_event
target:
entity_id: calendar.tvcalendar_gmail_com
data:
summary: "{{ states.input_text.epg_calendar_summary.state }}"
description: "{{ states.input_text.epg_calendar_description.state }}"
start_date_time: "{{ states.input_text.epg_calendar_start_date_time.state }}"
end_date_time: "{{ states.input_text.epg_calendar_end_date_time.state }}"
location: "{{ states.input_text.epg_calendar_location.state }}"
mode: single
The only thing to do, is change the calendar “tvcalendar_gmail_com” to your own calendar that you integrated in HA …
There is however one downside (That I will solve in a future update):
Because clicking on those links, the “get”-method gets trigger in the Webhook (this is normal behaviour, there is nog workaround for this),
so a download of 0 KB gets triggered in your browser.
On an iPad this is even worse, the download causes the “browser” (iFrame) to show an empty page 🙁
You need to “reload” the epg …
Enjoy 🙂
IP need to be changed in epg_timer.py too
Hi Kris, thanks a lot for your work, I have the EPG almost working.
My main problem right now is to adjust the time of the EPG, it seems the EPG is asheduled at UTC time, so all the TV guide is shifted 3hs (I live in Argentina, so my time is -3 UTC).
I don´t know where do you live, but maybe you also faced this issue, How did you solved it?
Thanks again, and Hope you can help me.
Hi Pablo,
Sorry for the late reply, I’m currently on holidays. (I will be back on October 1st)
It will be the first thing that I do, implement a time shift, and put one updated script online.
Sorry that this is not implemented yet, I’m in Belgium, so no need for timeshift for me…
Best regards,
Kris